Or: Beatmatching part one...
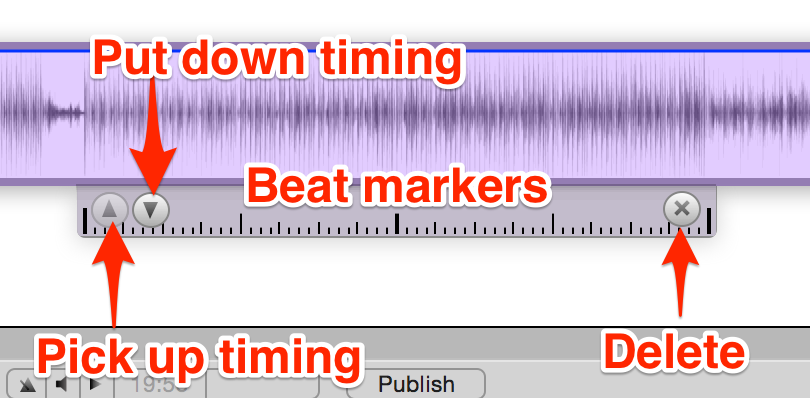
It can't have escaped your notice that the tracks you've been playing with have tabs, much like index card tabs, hanging off them. These are called "timing tabs", let's have a closer look:

The timing tabs show where MixTape considers there to be a beat in the music. There's often more than one on a track because MixTape tries to find distinct regions where it can find the timing the best instead of trying to force a grid across the entire track. The upshot of this is that there is no attempt to force a beat into 'beatless' sections, and that music that changes tempo slightly - say, music made by actual musicians - is still able to be beatmatched. Those wishing to torture some music software can ask Ableton to beatmatch "Jigsaw Falling Into Place" by Radiohead. Poor thing.
Next: the markers. Most western music is constructed using fours: four individual beats make up one 'bar'; and sections (or loops) are generally made from groups of four, eight or sixteen bars. Pictured above is a 'full length' timing tab which is to say it is sixteen bars long. You can count them if you want or observe that:
- The first beat of every sixteen bar section is 'larger'.
- The first beat of every eight bar section is too, but not by as much.
- Ditto four bar sections.
- Individual bars are marked, too.
- As is each individual beat in the bar.
Hence not only is MixTape showing you the individual beats, but it's helping you understand the structure of the music itself.
Since doing is better than hearing, open up one of the demo mix libraries, pick a track (say, "Urban Sea") and add it to a new mix. Double click the track so it is selected and remains that way, then move it and/or the play head so the play head will pass over the timing tab. You might want to zoom in a bit, then start the preview playing (press space, click on workspace, whatever). As the preview plays you'll hear the timing tabs go under the playhead and as they do a "PING ping ping ping PING ping ping ping" noise will be made letting you know where MixTape thinks the beats are. It's right, too.
Unfortunately, while MixTape's beat detector is damn good, it's not perfect - and since accurate knowledge of where beats are is vital for beat matching, this is less than ideal. There are three types of problems it has: Not knowing where the 'drop' is or the start of a section of music is (common); getting the tempo out by exactly 2x (not as common); and being just very slightly out (very uncommon but not unheard of). Let's see how we can fix these...
Getting the timing tabs right
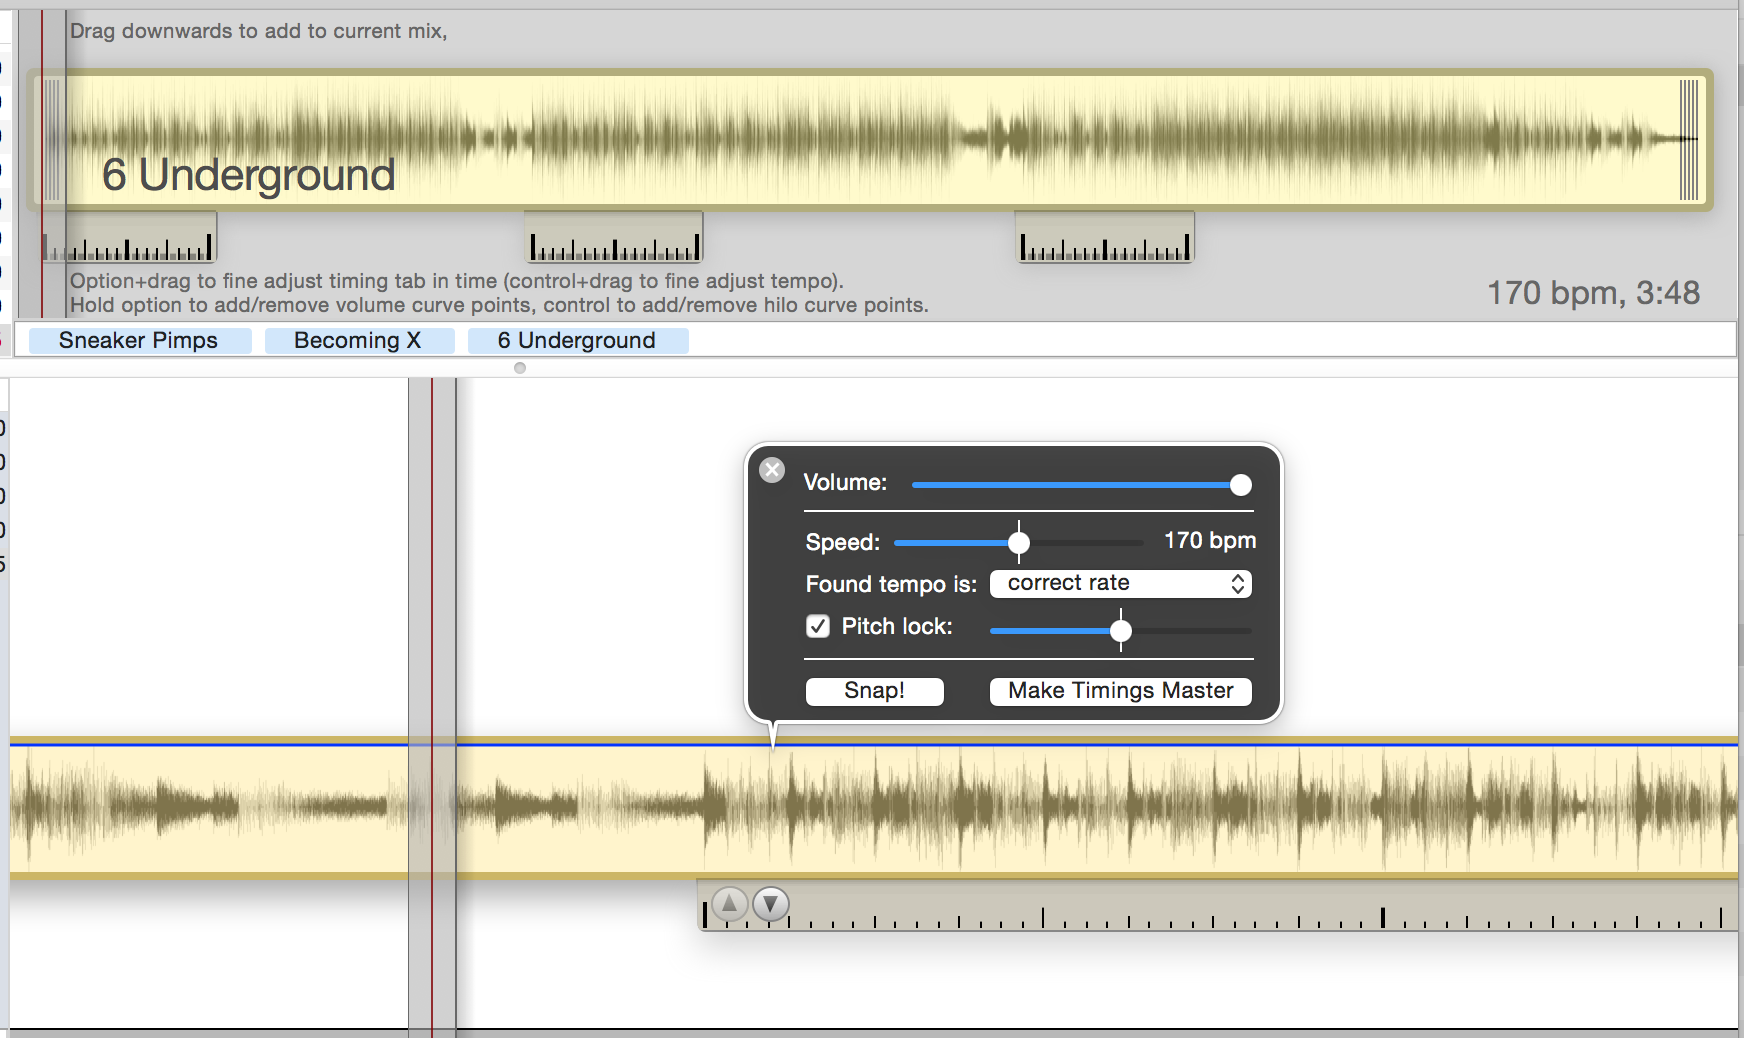
Here is a freshly imported track - i.e. here's one I didn't prepare earlier...

...and the timing tab we're looking at on the worksurface is the second one along in the library view. On the surface, everything looks OK but in practice it suffers from both of the above problems. Let's deal with them one at a time.
Out by 2x
On playing the track it becomes apparent that the detected tempo is just not right - the beats ping both on the 'on' beat and 'off' beat. It also thinks that 170 bpm is the right tempo which, it is not. On the properties box there is an option starting "Found tempo is" and is marked as being the correct rate. Let MixTape know what's happened by selecting "Found tempo is double correct rate" and MixTape will correct the bpm and beat markers for you - in this case to 85bpm.
Missing the drop
Again, while this looks right it actually isn't - what looks like a drop is actually the beat before the start of the bar. To fix this, just drag the timing tab to the actual start of the phrase. You'll see that it 'clicks' along moving one half beat at a time so, with enough zoom, this is really easy.
The other option, and the one that's faster once you've practiced it, is using the "snap!" button on the properties window. All you do here is: Move to a couple of bars before the drop and let the track play. In real-time, i.e. without stopping playback, press "snap!" just as the phrase starts and the timing tab will automatically move to the closest half beat. If you're too far away from the tab or if there is some other problem stopping the tab from moving (like another one being there already), then your mac will make an error sounding "bonk" and you'll know it hasn't happened. If you missed, just back up a little and try again.
Deleting tabs or creating new ones
Finally we often find that MixTape finds two regions where one would have done well enough. Pressing the 'X' button on the tab will delete it - and cmd+Z will put it back again if there was regret involved.
You can also create a new timing tab: move to where you want the tab to appear and press Cmd+T. MixTape will take a guess about what timings to use and create a new tab at the playhead. This tab can be dragged, snapped, whatever.
Fine tuning
Finally MixTape may sometimes be 'off' in terms of either the start time or tempo, these can be fixed with fine tuning. By the way, before trying this ensure you are in maximum zoom or you probably won't see anything.
If our timing tab is slightly too early or too late then: hold down 'option' with the cursor over the timing tab you want to correct, the cursor will turn into this...

Now drag along the timings tab. You'll see that it moves, but that instead of 'sticking' to the cursor it now moves only slightly. Fine tuning tempo is much the same, hold down 'Control'...

...and drag in the same way as fine tuning the start point. See that the beat markers move and, with larger corrections, a label on the tab itself will show how large the change in tempo is.
A final ninja trick is that both of these can be used while the worksurface is 'playing'. Fine tuning the in point of a tab while two tracks are playing together is an excellent way to get rid of the 'galloping horse' noise that a bad mix sometimes produces. This should, however, be a rare occurrence.
Make Timings Master
Finally, you may have noticed that name of your track (in the library listing) is red. MixTape does this to show that the timings are still as initially guessed by MixTape itself. Once you have finished setting the timings (i.e. locations of the timing tabs), clicking "Make Timings Master" will make these timings appear every time you include the track. You'll see the name go black as well - indicating that the timings have had a human ear listen to them and are (now) OK.
From here on in I'll assume that tracks have had their timing set like this and are 'set as master'.


